duckareawsome
Your Portfolio Page
Show off your peacock feathers as you begin to spread your wings and take flight into the world software development. Okay, peacocks can’t fly, but you get the point - your portfolio will give you a place to work and show off your coding projects!
Table of Contents
Prerequisites
- You should have completed the First Website project to create your home page and to understand basic HTML, CSS, and Git.
Overview
🎯 Goal: Create a portfolio page for your website. This page will contain links to your projects and serve as a showcase for your coding skills.
Specs
- At the end of this lesson, you’ll have a portfolio page added to your website.
- The portfolio will list your projects and help build a professional-looking resume of your coding experience.
- You’ll explore Cascading Style Sheets (CSS) in more depth and learn how to link pages with hyperlinks.
- You can optionally explore the basics of Responsive Design to make your site look good on all devices.
Type of App
You’re building a website that will be live on the internet through your GitHub page. It’s designed to be viewed in any web browser, like Chrome.
Lesson Steps
Work Flow: How to Navigate Through the Lesson Steps
🎯 Goal: Follow the steps in this lesson to build and customize your website one step at a time.
Step-by-Step Work Flow
-
📂 Open the
portfolio.htmlfile in your codespace to get started. - Look for TODO sections in the README:
- Each TODO has instructions for what you need to do next.
- These steps will tell you where to place new code inside the existing tags.
- Follow the instructions carefully for each TODO:
- Pay attention to where code should go (inside
<head>or<body>). - If a step asks you to add or remove code, only make those changes—don’t change anything else unless instructed.
- Pay attention to where code should go (inside
-
🖥️ Preview your site regularly using Live Server to see how your changes affect the website.
- Build gradually:
- Each TODO builds on the previous one, so complete them in order.
- Take your time to double-check your code before moving on to the next step.
✅ Check Your Work!
- After each TODO, double-check your code to ensure it matches the examples.
- If you encounter issues, preview your site using Live Server to troubleshoot.
TODO 0: Preview Your Site with Live Server
🎯 Goal: Preview your site in the browser to see how it looks and behaves as you make changes.
Step-by-Step Instructions
There are two ways to open your project with Live Server:
Option 1: Right-Click Method
- 📂 Find the
index.htmlfile in the file tree on the left side of your codespace. - Right-click on
index.htmland select “Open with Live Server.”
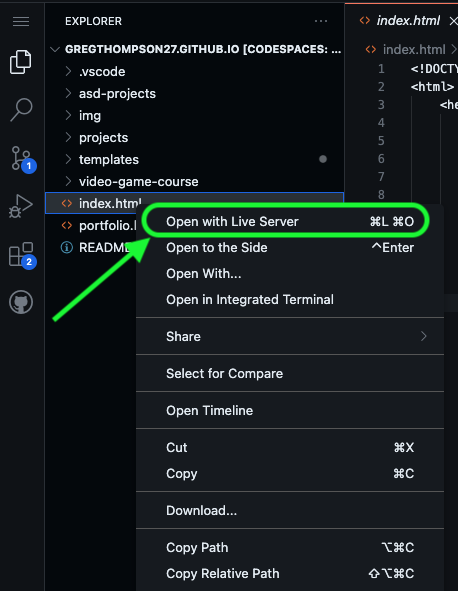
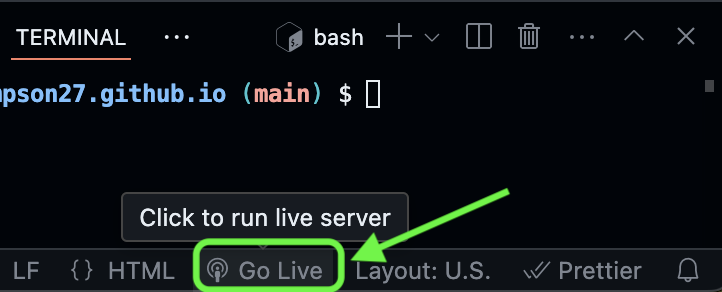
Option 2: Go Live Button in the Bottom Panel
- Look at the bottom-right corner of your codespace.
- Click the “Go Live” button to launch Live Server.
✅ Check Your Work!
- After launching Live Server, your browser should open a new tab with your site.
- By default, Live Server will always load your home page. You can click the link to your Portfolio page to monitor your progress for this project.
TODO 1: Create Portfolio Page
🎯 Goal: Build a new portfolio page from scratch.
Step-by-Step Instructions
-
🔍 Find the file tree
- Look to the left side of your codespace and find the list of project files and folders.
-
Open the
portfolio.htmlfile- 📂 Inside the file tree, click on
portfolio.htmlto open it.
- 📂 Inside the file tree, click on
-
Add the following boilerplate HTML to your file to set up the basic structure:
<!DOCTYPE html>
<html>
  <head>
    <title>CHANGE ME</title>
  </head>

  <body>
    <!-- All content goes here -->
    <div id="all-contents">

    </div>
  </body>
</html>
TODO 2: Add a Title
🎯 Goal: Add a title to your portfolio page to match the one on your homepage.
Step-by-Step Instructions
-
🔍 Locate the
<title>element inside the<head>element -
Update the text inside
<title>- Replace the text that says
CHANGE MEwith to match the title you added to your home page.
- Replace the text that says
Your updated <head> tag should look like this:
<head>
  <title>My Awesome Website</title>
</head>
✅ Check Your Work!
- Preview your site using Live Server
- Make sure the title appears in the browser tab.
TODO 3: Create Sections for the Menu and Main Content
🎯 Goal: Organize your webpage by adding two key sections — a navigation menu and a main content area. You’ll do this by placing <nav> and <main> elements inside the <div id="all-contents"> element.
Step-by-Step Instructions
-
🔍 Locate the
<div id="all-contents">element-
Find this part of the code:
<!-- All content goes here -->
<div id="all-contents">

</div>
-
-
Place the
<nav>and<main>elements inside the<div id="all-contents">element-
Your code should now look like this:
<div id="all-contents">
  <nav>

  </nav>

  <main>

  </main>
</div>
-
✅ Check Your Work!
- Make sure the
<nav>and<main>elements are inside the<div id="all-contents">element.
TODO 4: Add a Site Title and Navigation
🎯 Goal: Give your site a title and create a navigation menu to help visitors move between pages.
Step-by-Step Instructions
-
🔍 Find the
<nav>element-
Look for the following section in your code:
<nav>

</nav>
-
-
Add a title inside the
<nav>element- Place an
<h1>element inside<nav>. Between the opening and closing<h1>tags, type the title of your website. Use the same text you used for your home page to stay consistent.<h1>Your Name's Amazing Website</h1>
- Place an
-
Create an unordered list for your navigation menu
-
Below the
<h1>element, add a<ul id="nav-ul">element:<ul id="nav-ul"> </ul>
-
-
Add two list items for the menu
-
Inside the
<ul>element, add the following two<li>elements:-
One to link to your home page
<li class="nav-li"> <a href="index.html">Home</a> </li> -
Another to link to your portfolio page
<li class="nav-li">
  <a href="portfolio.html">Portfolio</a>
</li>
-
-
After completing this TODO, your <nav> section should look like this:
<nav>
  <h1>Your Name's Amazing Website</h1>
  <ul id="nav-ul">
    <li class="nav-li">
      <a href="index.html">Home</a>
    </li>
    <li class="nav-li">
      <a href="portfolio.html">Portfolio</a>
    </li>
  </ul>
</nav>
✅ Check Your Work!
- Make sure the
<h1>and<ul>elements are inside the<nav>element. - Preview your site using Live Server to ensure your title and links appear on the site.
TODO 5: Create the Main Content
🎯 Goal: Add a section to display your projects.
Step-by-Step Instructions
-
🔍 Find the existing
<main>element inportfolio.html.-
It should look like this:
<main>

</main>
-
-
Create a new section to hold the content:
- Add a new
<div>element inside the<main>element. - Add a
class="content"attribute to the new<div>.
- Add a new
-
Add a header inside the new
<div>to label this section:- Place an
<h1>tag inside the<div class="content"> - Add the text
Portfolioinside the new<h1>.
- Place an
-
Create an empty unordered list to display your projects later:
- Add a
<ul>element below the<h1>tag. - Add an
id="portfolio"attribute to the<ul>elemnt
- Add a
After completing these steps, your <main> section should look like this:
<main>
  <div class="content">
    <h1>Portfolio</h1>
    <ul id="portfolio">

    </ul>
  </div>
</main>
✅ Check Your Work!
- Preview your site using Live Server to make sure the “Portfolio” text is visible.
TODO 6: Link Your Future Projects
🎯 Goal: Add links to your upcoming projects.
Step-by-Step Instructions
-
🔍 Find the
<ul id="portfolio">element you added in the previous step. -
Add these three
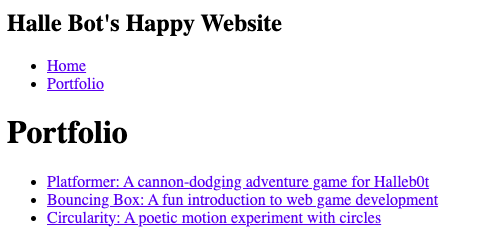
<li>elements with links to your projects into the<ul>element:<li> <a href="fsd-projects/platformer/">Platformer: A cannon-dodging adventure game for Halleb0t</a> </li> <li> <a href="fsd-projects/bouncing-box/">Bouncing Box: A fun introduction to web game development</a> </li> <li> <a href="fsd-projects/circularity/">Circularity: A poetic motion experiment with circles</a> </li>
✅ Check Your Work!
- Preview your site to ensure all links are clickable.
- Check to make sure your website looks like the image below before moving on:
TODO 7: Add CSS
🎯 Goal: Link your CSS stylesheet and style the portfolio page.
Step-by-Step Instructions
-
🔍 Find the
<head>tag insideportfolio.html. -
Add a
<link>tag inside the<head>element to link the CSS file.- Note that the link tag does not require a closing tag
- Add a
rel="stylesheet"attribute andhref="style.css"attribute inside the<link>tag- Your code should now look like this:
<head>
  <title>Your Name's Website</title>
  <link rel="stylesheet" href="style.css" />
</head>
- Your code should now look like this:
- Open the
style.cssfile and add the following styles to the bottom of the file:/* Portfolio styles */ .content h1 { color: black; } #portfolio { list-style-type: none; padding-left: 0; } #portfolio li { background: #fff; padding: 10px; border-radius: 10px; margin-bottom: 10px; } #portfolio li:hover { background: #eee; } #portfolio a { text-decoration: none; color: #454545; }
✅ Check Your Work!
- Preview your site using Live Server to ensure the new styles are applied.
Extra CSS Challenges
Here’s some other things to try:
- Google “CSS border radius” and add a
border-radiusproperty to the nav selector to give the<nav>element rounded corners - Add a border around the image in your home page
- Change the background color
- Add a favicon to your
index.htmlandportfolio.htmlfiles. Favicons are cool ways to customize your page!- Learn more about favicons here
- Make your website mobile responsive.
Here’s some CSS to get you started on making your website mobile responsive. You can add this code to the bottom of your CSS file.
/* responsive web design */
@media screen and (min-width: 120px) and (max-width: 1080px) {
  main {
    height: 100ch;
    zoom: 1.5;
    display: grid;
  }

  h1 {
    font-size: 44px;
  }

  h2 {
    font-size: 42px;
  }

  h3 {
    font-size: 36px;
  }

  #all-contents {
    height: 100ch;
    margin: none;
  }

  a {
    font-size: 42px;
  }

  .sidebar {
    margin-right: 0px;
    justify-content: center;
    align-items: center;
  }

  .sidebar-img {
    width: 100%;
  }

  p,
  li {
    font-size: 24px;
  }

  .content {
    align-content: center;
    justify-content: center;
  }
}
✅ Check Your Work!
If you made any changes in the “Extra Challenges” section:
- Preview your site using Live Server to ensure the new styles are applied.
TODO 8: Go Live
🎯 Goal: Push your changes to GitHub and make your portfolio go live.
Step-by-Step Instructions
-
Open the terminal in your codespace
- If the terminal isn’t visible, click the Hamburger Menu > Terminal > New Terminal.
-
Enter the following commands one by one in the terminal, pressing enter after each command to run it:
git add . git commit -m "add portfolio page to website" git push -
Wait a few minutes for the changes to go live at your-username.github.io.
✅ Check Your Work!
- Visit the site
your-github-username.github.ioto see your website live on the internet. If it doesn’t appear immediately, wait a few minutes and try refreshing your page.- Make sure to replace the text
"your-github-username"with your actual github username when entering the URL in your browser.
- Make sure to replace the text
- Click the link to your “Portfolio” from your home page to ensure your Portfolio is live on the web